Prevent Vendor Fraud: Tiered Onboarding Checklist for Procurement
A vendor onboarding checklist is the step-by-step gate that verifies identity, tax status, bank details, insurance, and compliance so a supplier is payment-ready and audit-ready before the first purchase order. It collects a legal name, tax form, and verified bank account at minimum. The next move is simple: run a duplicate check against your vendor master, or open the intake form if the supplier is genuinely new.
TL;DR:
- Low-risk vendors can complete onboarding within 1 to 3 business days by limiting checks and automating document validations, while high-risk vendors may need 5 to 15 days for full verification.
- Automated portals with field validation and immediate screening significantly reduce manual follow-up, errors, and delays during the onboarding process.
- Verifying bank details through secure channels and independent callbacks prevents the main fraud vectors associated with email-based changes.
- Maintaining a single, verified vendor master record ensures accurate data flow into procurement and accounts payable systems, preventing rekeying errors and fraud.
- Regular post-onboarding reviews, including performance and compliance checks, enable dynamic risk assessment and tier adjustment, supporting ongoing vendor lifecycle management.
Table of Contents
- What Is a Vendor Onboarding Checklist and Who Owns It?
- Why a Standardized Vendor Onboarding Process Pays Off
- The Step-by-Step Vendor Onboarding Checklist
- How Should You Tier Vendors and Set Onboarding Timelines?
- What Tools and Automation Actually Speed Up Onboarding?
- Common Vendor Onboarding Mistakes and How to Fix Them
- How Do You Monitor Vendors After Onboarding?
- How Do You Get Internal Stakeholders on Board with Onboarding?
- What Happens When a Vendor Won’t Provide Required Documentation?
- How Does Onboarding Connect to Procurement and AP Systems?
- How Do You Track Vendor Performance After Onboarding?
- A Procurement Perspective on Making Onboarding Actually Work
- How Amazing Devs Reduces Onboarding Friction for Nearshore IT Vendors
- Templates and Benchmarks Worth Bookmarking
- Sources
- FAQ
What Is a Vendor Onboarding Checklist and Who Owns It?
A vendor onboarding checklist is a structured, step-by-step tool procurement and finance teams use to collect, verify, and approve supplier information before any work or payment happens, according to Bill’s guidance on the vendor onboarding process. It is a one-time gate, not an ongoing program. Vendor management, by contrast, is the lifecycle work that continues for years after that gate closes: performance reviews, contract renewals, recertifications.
Ownership usually splits two ways. Finance controls the tax and bank verification because a mistake there creates fraud or IRS exposure. Procurement sponsors the vendor relationship and drives the intake, scoping, and approval routing. Neither team should own the whole process alone.
The output of a well-run vendor onboarding process is a single, verified vendor master record containing:
- Legal entity name, DBA, and tax ID
- Verified remit-to bank details
- Signed contract and current insurance certificate
- An assigned risk tier and approval timestamp
Why a Standardized Vendor Onboarding Process Pays Off
Skipping structure here is expensive in ways that don’t show up until an audit or a fraud attempt. A standardized checklist closes the two biggest exposure points: bank fraud and messy 1099 reporting. It also cuts the invoice exceptions that eat an AP team’s week.
The real cost isn’t the paperwork. It’s the vendor who gets paid twice, the bank-change email that turns out to be a scam, or the 1099 that goes to the wrong tax ID because nobody verified it at intake.
Standardizing the process delivers:
- Fewer successful business email compromise attempts, because bank changes require independent verification, not a trusting glance at an email
- Cleaner audit trails when every approval carries a timestamp and an owner
- Faster time-to-pay once a vendor clears the gate, since AP isn’t chasing missing W-9s mid-invoice
- A better first impression on vendors, who see exactly what’s expected and when they’ll be paid
Vendor onboarding shouldn’t end at activation. It’s the front door to ongoing vendor lifecycle management, and low-risk vendors can drift into higher-risk status as their data access or spend grows.
The Step-by-Step Vendor Onboarding Checklist
This is the sequence that holds up under audit, organized in the order each phase actually happens. Assign one owner per step and track status as Not Started, In Progress, Complete, or N/A, a practice ProcurementVMS’s onboarding framework recommends specifically because it creates the audit trail auditors ask for.
- Intake and deduplication. Capture legal name, DBA, EIN or TIN, remit-to address, AP contact, expected annual spend, and sponsoring department. Run a dedupe check against the existing vendor master before anything else. If a match surfaces, require a written justification to proceed rather than silently creating a duplicate record.
- Pre-screening and tier assignment. Score the vendor on spend, data access, and strategic importance to assign a Tier 1, 2, or 3 risk level. This tier determines which of the remaining steps actually apply.
- Document collection. Gather the W-9 or W-8 for tax classification, a certificate of insurance, business licenses, SOC 2 or ISO reports for vendors touching systems or data, the signed contract, and an NDA where applicable. Collect all of it in one pass at intake rather than in a later scramble. Chasing documents after the first invoice is how vendor files stay permanently incomplete, a pattern ProcureDesk’s step-by-step guide flags as a common failure point.
- Tax and bank verification. Never accept bank details or a bank-change request by email alone. Verify through a secure portal, a micro-deposit confirmation, or an independent phone callback to a known contact number, not one supplied in the same email requesting the change.
- Compliance and sanctions screening. Run KYC checks and screen against OFAC and SAM lists before any funds move. This step is non-negotiable for Tier 1 and Tier 2 vendors and worth doing even for smaller ones.
- Approval routing and sign-off. Route the completed file through a workflow that timestamps each approval. This is what turns a folder of documents into an audit-ready record.
- Vendor master setup. Create one authoritative record with GL code, AP contact, default cost center, payment terms, and an expiration schedule for insurance and certifications, an approach ProcureDesk calls treating the record as an atomic operation so downstream teams never rekey conflicting data into the ERP.
- Go-live. Cut the first PO, confirm receipt and invoice match cleanly, and schedule a 30-day review to catch setup errors before they compound.
Pro Tip: Build the intake form itself as the deduplication mechanism. If a submitted EIN already exists in your vendor master, block the form from proceeding until someone provides a reason. That single rule stops more duplicate-vendor headaches than any downstream cleanup project ever will.
How Should You Tier Vendors and Set Onboarding Timelines?
Not every vendor needs the full 50-point treatment. Applying identical scrutiny to a $500 office-supplies vendor and a $2 million data processor wastes time on the former and under-checks the latter.
- Tier 3 (low risk): Low spend, no data access, no strategic dependency. Target completion: 1 to 3 business days. Light document checks, basic tax and bank verification.
- Tier 2 (moderate risk): Meaningful spend or limited system access. Target completion: 3 to 7 business days. Full document set, sanctions screening, manager-level sign-off.
- Tier 1 (high risk or strategic): High spend, sensitive data access, or business-critical dependency. Target completion: 5 to 15 business days. Full checklist, SOC 2/ISO review, sanctions screening, and executive or finance-controller sign-off.
These targets track industry benchmarking: APQC data cited by OnboardMap puts median supplier setup around 3 calendar days for typical vendors, with low-risk suppliers often clearing in 1 to 3 business days and strategic vendors stretching to one to two weeks. Applying a smaller subset of checks to low-risk vendors and reserving the full framework for Tier 1 suppliers is exactly the approach ProcurementVMS’s framework recommends. Build a sign-off matrix that names the approval authority for each tier so nobody has to guess who signs.
What Tools and Automation Actually Speed Up Onboarding?
The friction in most onboarding processes isn’t the checklist itself, it’s the back-and-forth chasing missing fields. A single intake portal that validates tax ID format and required attachments on submission removes most of that friction before it starts, a pattern Amazon Business’s supplier onboarding guidance confirms cuts stalls significantly.
Prioritize these features when evaluating a vendor portal or onboarding module:
- Self-service uploads with field-level validation, so incomplete submissions bounce back automatically instead of sitting in an inbox
- Automated OFAC and SAM screening triggered the moment a vendor record is created, rather than as a manual step someone might skip
- Workflow routing that adjusts by tier and spend, with every approval timestamped for the audit trail
- Direct ERP and AP integration to avoid rekeying vendor data twice and creating two slightly different records
- Access controls that limit what a vendor portal exposes, since granting supplier-side access always carries some data exposure
Stripe’s resources on supplier and vendor onboarding point to the same core set: portals, automated compliance screening, and tiered workflow routing as the levers that move the needle most.
Pro Tip: If your ERP can’t enforce the tier assignment automatically, at minimum build a dashboard that flags certificates and insurance policies expiring in the next 30 days. Manual expiry tracking is where most compliance gaps actually start.
Common Vendor Onboarding Mistakes and How to Fix Them
Most onboarding failures trace back to a handful of repeat offenders. Here’s what tends to go wrong and the fix that actually holds:
- Accepting bank details by email. This is the single biggest fraud vector in AP. Fix: require portal submission with micro-deposit confirmation or an independent callback, not verification against a number in the same email, a control ProcureDesk recommends specifically for bank-change requests.
- One-size-fits-all onboarding. Running full diligence on every vendor slows down low-risk suppliers and burns reviewer time. Fix: risk-based tiering, with a lighter checklist for Tier 3 and the full framework reserved for Tier 1.
- Approvals stuck in email threads. Sign-off buried in someone’s inbox has no audit trail and no accountability. Fix: route approvals through a workflow tool that timestamps each step automatically.
- No expiry tracking on certificates. Insurance and SOC 2 reports lapse quietly, and nobody notices until a vendor is technically non-compliant. Fix: automated reminders tied to a dashboard, not a calendar note someone forgets to set.
How Do You Monitor Vendors After Onboarding?
The first 30 days catch the errors that onboarding itself missed. Run a full PO to receipt to invoice to payment cycle on the very first transaction and watch for mismatches in terms, GL coding, pricing, or remit-to details. These are the errors that, left uncaught, repeat on every invoice for the life of the relationship.
- Complete a 30-day checklist review specifically checking payment terms, GL code accuracy, agreed pricing, and remit address against the contract
- Schedule automatic revalidation dates for expiring insurance certificates, SOC 2 reports, and any required licenses
- Set a monitoring cadence by tier: Tier 1 vendors reviewed quarterly, Tier 2 semiannually, Tier 3 annually or on renewal
Vendor risk isn’t static. A Tier 3 vendor that starts touching customer data six months in needs to move up a tier, which is the core argument behind treating onboarding as the opening move in ongoing lifecycle management rather than a one-time gate you can forget about.
How Do You Get Internal Stakeholders on Board with Onboarding?
A checklist only works if the people submitting requests and approving them actually follow it. The most common breakdown isn’t a broken process, it’s a business owner who emails a new supplier’s invoice straight to AP because they don’t know an intake form exists.
Fix this with a short, mandatory walkthrough for anyone who requests new vendors: what the intake form captures, why bank verification takes a few extra days, and what happens if they route around it (a rejected invoice, most likely). Put the intake link in the procurement policy, the AP inbox auto-reply, and the new-manager onboarding packet. Redundant placement beats a single buried wiki page.
Give finance, procurement, and department requesters a shared view of where a vendor sits in the pipeline. When a marketing director can see that their new vendor is stuck at “bank verification pending” instead of wondering why the vendor hasn’t been paid, half the frustrated follow-up emails disappear on their own.
Report onboarding SLAs upward, too. A monthly summary showing average time-to-onboard by tier, along with the count of vendors stuck past target, gives leadership a reason to enforce the process instead of granting exceptions. Exceptions are how a clean checklist turns into a pile of unverified vendors within a year.
What Happens When a Vendor Won’t Provide Required Documentation?
Some vendors stall on a W-9, resist a sanctions screen, or simply don’t have a SOC 2 report to hand over. How you handle that gap determines whether your vendor file stays clean or slowly fills with exceptions nobody remembers approving.
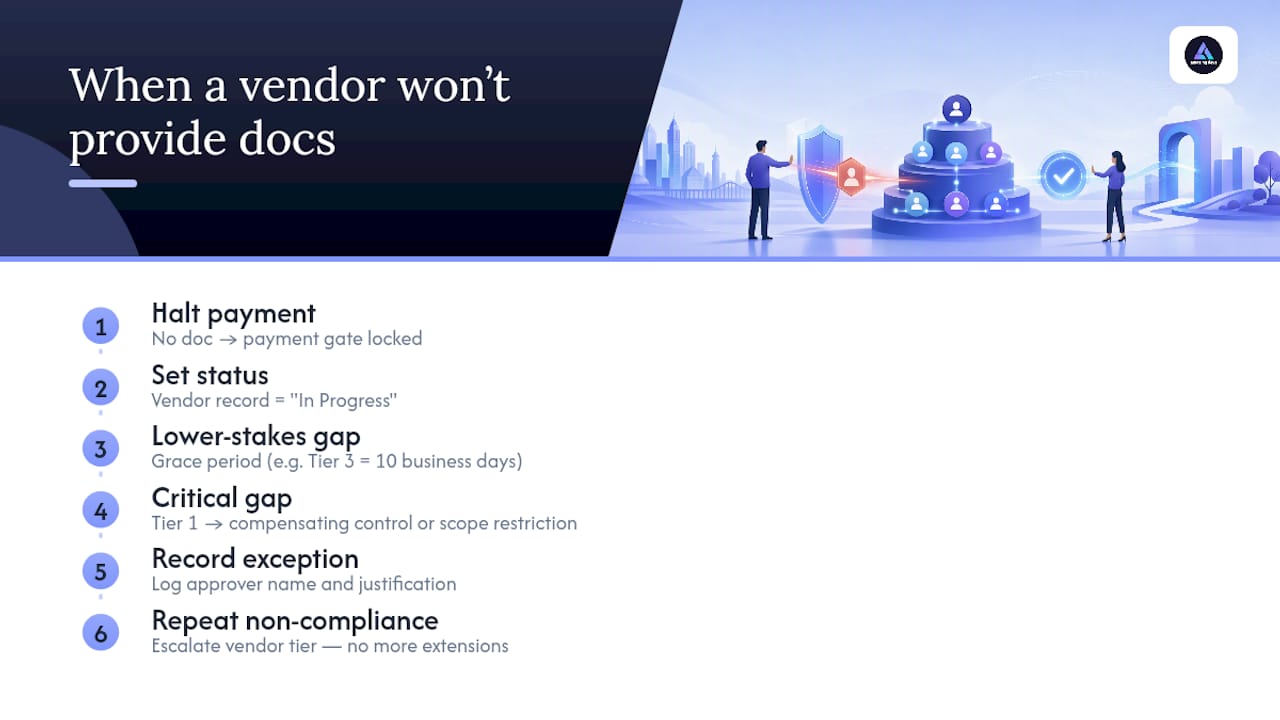
Start with a hard rule: no document, no payment gate cleared. A good onboarding process should physically prevent a vendor from being paid before verification is complete, not just discourage it, a principle ProcureDesk’s guide to the onboarding process treats as a baseline control. If a critical document like a signed W-9 or a certificate of insurance is missing, the vendor record stays in “In Progress” status regardless of how urgently the business unit wants to place an order.
For lower-stakes gaps, offer a defined grace period with a hard deadline attached, not an open-ended “get it to us when you can.” A Tier 3 vendor missing a minor license might get 10 business days with a calendar reminder to the requesting department. A Tier 1 vendor missing a SOC 2 report is a different conversation entirely, often one that involves a compensating control or a temporary scope restriction until the report arrives.
Document every exception in the vendor record itself, including who approved it and why. An auditor who finds an active vendor with an incomplete file wants to see a justification with a name attached, not a silent gap. Treat repeated non-compliance from the same vendor as a signal to escalate the tier assignment rather than keep granting extensions.
How Does Onboarding Connect to Procurement and AP Systems?
A vendor onboarding checklist that lives in a spreadsheet disconnected from your ERP creates exactly the rekeying problem it’s supposed to prevent. The vendor master record created at the end of onboarding needs to flow directly into the systems that touch purchase orders and payments, not get manually copied into them by someone on the AP team.
Set up the vendor master as the single source of truth, with GL code, default cost center, payment terms, and AP contact fields structured so your ERP can consume them without translation. This is the atomic-record approach that keeps downstream systems from ending up with three slightly different versions of the same vendor.
The connection matters most at the PO stage. If procurement can cut a purchase order against a vendor that hasn’t cleared the onboarding gate, the whole checklist becomes optional in practice, no matter how thorough it looks on paper. Configure your procurement system to block PO creation for any vendor status other than “Complete.” That one system rule enforces more compliance than any policy memo.
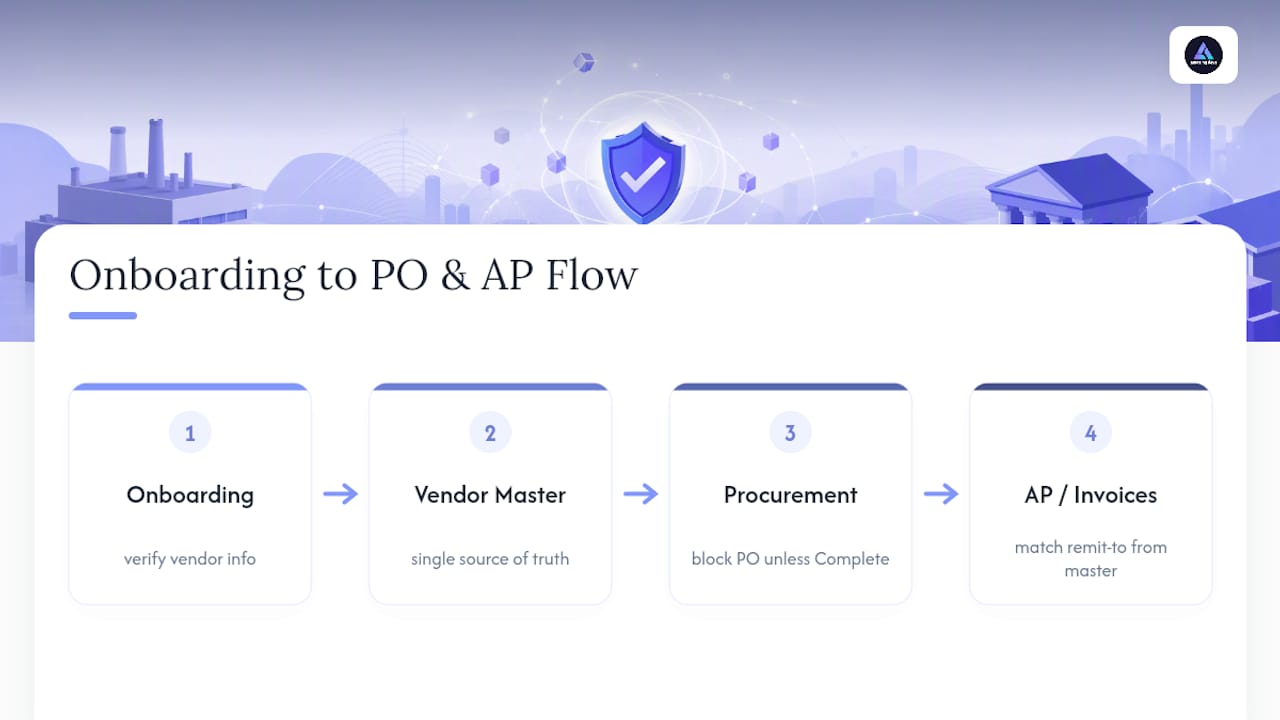
AP integration matters just as much on the invoice side. When invoice matching pulls payment terms and remit-to details directly from the verified vendor master instead of whatever the invoice itself says, you close the gap that lets a fraudulent remit-to change slip through on invoice three after onboarding already verified the real bank account on day one.
How Do You Track Vendor Performance After Onboarding?
Onboarding ends with a payment-ready vendor. It doesn’t end the need to know whether that vendor is actually performing.
Build a lightweight scorecard tied to the vendor’s tier: on-time delivery rate, invoice accuracy, and responsiveness to information requests for Tier 2 and Tier 3 vendors; add security posture and SLA adherence for Tier 1 vendors handling data or running mission-critical work. Review Tier 1 scorecards quarterly, matching the same cadence recommended for revalidation checks.
Feed what you learn back into the vendor record, not just into a performance-review meeting nobody follows up on. A vendor with a pattern of late invoices or repeated documentation gaps should trigger a tier reassessment, not a shrug. This is also where the original onboarding data pays off twice: a clean, verified vendor master makes it far easier to spot when something has changed, because you know what “normal” looked like at intake.
Close the loop with the vendor too. A short quarterly check-in for Tier 1 suppliers, covering what’s working and what’s not, catches problems before they show up as a missed deadline or a compliance lapse. The vendors worth keeping generally welcome the conversation. The ones who avoid it are telling you something.
A Procurement Perspective on Making Onboarding Actually Work
Pilot the checklist on one vendor category first and measure time-to-onboard before rolling it out everywhere. Assign a named owner to every item; unowned steps get waved through under deadline pressure. Report onboarding SLAs to stakeholders monthly. That visibility is what keeps a good checklist from quietly decaying into a rubber stamp within six months.
— Gabriel
How Amazing Devs Reduces Onboarding Friction for Nearshore IT Vendors
Onboarding a new IT staffing vendor is usually where procurement teams lose the most time: tax forms for a foreign entity, contract review, insurance verification, and a dozen emails just to confirm a bank account, a process improved by solutions like those described in the white-label AI platform case study. Amazing Devs cuts most of that out before it starts.

Every developer comes through Amazing Devs pre-vetted for technical skill and cultural fit, and the contract sits with Amazing Devs rather than with a foreign individual, which means your onboarding checklist deals with one managed entity instead of chasing paperwork from multiple contractors across borders. One point of contact handles the bureaucratic back-and-forth that would otherwise land on your procurement team, which is exactly the friction a vendor onboarding checklist is designed to control in the first place. If your team is scoping a nearshore engineering vendor and wants a head start on the documentation your checklist will require, request a vendor-ready package from Amazing Devs to see what a pre-vetted intake looks like.
Templates and Benchmarks Worth Bookmarking
For teams building or refining their own process, ProcurementVMS’s 50-point framework offers a downloadable checklist template with owner and status fields built in. OnboardMap’s practical guide carries the APQC timeline benchmarks referenced above. For vendors handling sensitive data or systems, Vanta’s risk-aware onboarding guide walks through the security-specific checks worth adding to a standard checklist.
Sources
- Vendor onboarding? | Bill
- Vendor onboarding: A risk-aware guide – Vanta
- Vendor Onboarding Checklist: Free 50-Point Framework 2026
FAQ
What Is a Vendor Onboarding Checklist?
It’s a structured tool procurement and finance teams use to collect, verify, and approve supplier information, including tax forms, bank details, insurance, and contracts, before any purchase order or payment goes out, according to Bill’s overview of vendor onboarding.
How Do You Onboard a New Vendor?
Start with an intake form that checks for duplicates, assign a risk tier, collect required documents like a W-9 and certificate of insurance, verify tax and bank details through a secure channel, screen for sanctions, and route the file for timestamped approval before creating the vendor master record and issuing the first PO.
What Are the “4 Cs” of a Vendor Checklist?
There’s no single, universally agreed definition of a “4 Cs” framework for vendor onboarding checklists. If you’ve seen the term used, treat it as one vendor’s shorthand rather than an industry standard, and rely instead on the phased structure (intake, screening, verification, approval) that most procurement teams actually use.
How Long Should Vendor Onboarding Take?
Timelines depend on risk tier: low-risk vendors often clear in 1 to 3 business days, moderate-risk vendors in 3 to 7 days, and high-risk or strategic vendors in 5 to 15 business days, consistent with APQC benchmarking cited by OnboardMap.
Can a Nearshore IT Staffing Vendor Speed Up Onboarding?
Yes. A staffing partner like Amazing Devs that manages the contract and pre-vets talent reduces the number of individual entities your checklist has to verify, which shortens the document collection and tax verification steps considerably.